
Key Takeaways
Contents
JustWolves is an educational platform and is not a SEBI-registered investment advisor. Trading financial instruments involves significant risk of loss and may not be suitable for all investors. Past performance is not indicative of future results. Read our full disclaimer →
❝Every swing high and swing low on your chart is not just a technical level — it is a pool of resting orders that tells you exactly where price is likely to go next. Learn to read that story and you will always know the next target.
What Is Liquidity?
In this context, liquidity refers to swing highs and swing lows — also called swing points. Above every swing high and below every swing low, resting orders are waiting. These are the stop-losses and pending orders of retail traders, and they represent fuel for the market's next major move.
Previous candle highs and previous candle lows are also liquidity — they are simply swing points visible on a lower time frame. The market is fractal: the same logic applies on a 1-minute chart as on a weekly chart.
Key Concept
Liquidity is not a support or resistance level. It is a pool of resting orders — stop-losses placed by retail traders — that institutions target before making their real directional move.
Sweep vs. Run: The Only Decision That Matters
Every time price trades above a swing high or below a swing low, exactly one of two things can happen. Understanding which one is unfolding tells you the next target with clarity.
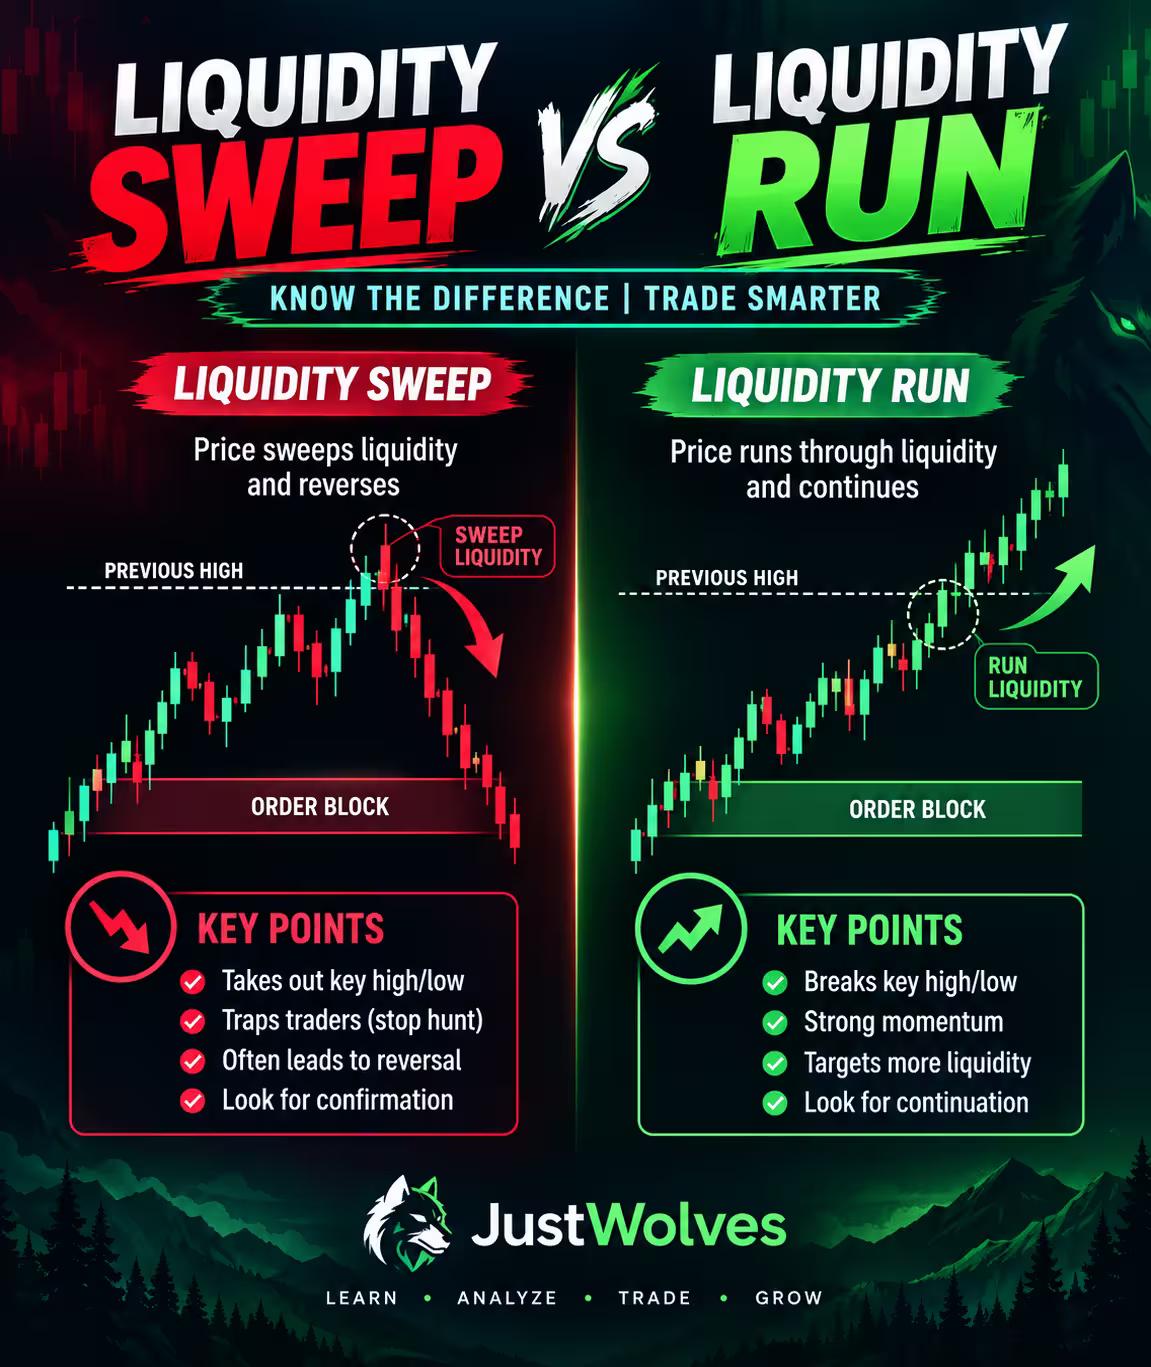
A sweep means price trades through the swing point, rejects, and reverses direction — a short-term reversal. A run means price trades through the swing point and continues in the same direction — a continuation toward the next liquidity pool.
The Four-Rule Target Framework
These four rules define every possible outcome at a swing point. Write them down and apply them every time price reaches a level.
The Four Rules
Always Wait for Confirmation
When price first arrives at a swing point, nothing is confirmed. Keep an open mind, mark both possible targets, and wait for more candles to develop before acting.
Confirming a Run: The Two-Sting Pattern
The clearest confirmation of a run on liquidity is the two-sting pattern. When price first trades through a swing point, that is the first sting — it confirms nothing on its own. Price then retraces briefly (even a single wick counts), and then trades through the level again. That second push is the second sting, and it confirms the run.
If price explodes through a level without a visible retracement on your current time frame, drop one time frame lower. A 4H trader drops to 1H, a 1H trader drops to 15M. The two stings will be clearly visible at the lower time frame.
How to Confirm a Run
- 1
Identify the first sting
Price trades above the swing high (or below the swing low) for the first time. Mark the level. Do not trade yet — the outcome is still uncertain.
- 2
Wait for the retracement
Price pulls back from the swing point. This can be a full candle retracement or simply a wick. It does not need to be a large move.
💡 If there is no visible retracement on your time frame, drop one level lower to see the two stings more clearly.
- 3
Confirm on the second sting
Price trades through the level again. This second push confirms a run. The next swing point in that direction becomes your target.
"Being right early is just as bad as being wrong. Wait for the second sting before committing to a direction.
Confirming a Sweep: PD Arrays
Confirming a sweep requires understanding what forces are competing against the swing point after the first sting. When price retraces from a swing high, it often retraces into an order block and a fair value gap — structures that push price back higher. The swing high itself pushes price lower.
This creates a battle. Whichever side fails first determines whether the outcome is a sweep or a run. When price is stuck between these forces, you will see small choppy candles — not a sign of confusion, but a sign that the market is deciding.
How to Confirm a Sweep
- 1
Mark the PD arrays on the retracement
After the first sting, identify the order block (the candles before the original move) and any fair value gap that price is retracing into.
- 2
Watch for the failed bounce
Price bounces weakly from the order block or fair value gap but does not break back above the swing point. The bounce is small and unconvincing.
💡 A failed bounce that barely reaches the midpoint of the order block is a strong sweep signal.
- 3
Wait for the break of the consolidation low
When price breaks below the low formed during the consolidation after the first sting, the sweep is confirmed. The low of the order block becomes your target.
PD Arrays: The Three Structures You Need
Three price delivery arrays interact with liquidity constantly. Understanding them is essential for confirming sweeps.
The Three PD Arrays
Why Consolidation Happens
When price consolidates after breaking a swing high, it is not broken — it is stuck between the swing high pushing lower and the order block or fair value gap pushing higher. One side will fail. That failure is your signal.
The Decision Framework at Any Swing Point
Apply this process every time price reaches a swing high or swing low. The framework is identical regardless of asset or time frame.
5-Step Liquidity Decision Process
- 1
Mark both targets before price arrives
Identify the next swing high above for the run target and the next swing low below for the sweep target. Have both levels on your chart before price interacts with the level.
- 2
Wait for the first sting
Let price trade through the level. Nothing is confirmed. Do not trade.
- 3
Let more candles develop
Watch whether price is interacting with the order block and fair value gap below. Look for the two-sting pattern forming or the failed bounce pattern.
- 4
Apply the confirmation rules
Second sting confirms a run — target the next swing point in that direction. Failed bounce and break of consolidation low confirms a sweep — target the order block low.
💡 When genuinely uncertain, wait. A missed trade is better than a wrong one. The market will always give another opportunity.
- 5
Drop a time frame if needed
If the pattern is not visible on your primary time frame, go one level lower. The two-sting or sweep rejection will be clearly visible there.
Key Takeaways
What to Remember
Frequently Asked Questions
What is the difference between a sweep and a run on liquidity?
A sweep is when price trades through a swing point, then rejects and reverses — targeting the opposite side. A run is when price trades through the level and continues in the same direction, targeting the next swing point on that same side.
What is the two-sting pattern?
The two-sting is a run confirmation method. Price trades through a swing high or low for the first time (first sting), pulls back briefly, then trades through again (second sting). That second push confirms a run is in play.
What is an order block?
An order block is the group of candles that formed the retracement before a strong directional move. When price returns to that zone, it tends to act as support or resistance. Combined with a fair value gap, it creates the competing force that causes consolidation after a swing point breach.
Does this work on all time frames?
Yes. The market is fractal — the same patterns appear on 1-minute charts and weekly charts. When the pattern is unclear on your time frame, dropping one level lower will almost always reveal it more cleanly.
Up Next
Fair Value Gaps in Forex